Client:Server:Sensor
The system for determining the deviation from a given course. Provides the ability to visualize data from the angular velocity sensor. As the server stands Raspberry Pi 3, configured to work in router mode. Client - any web browser.
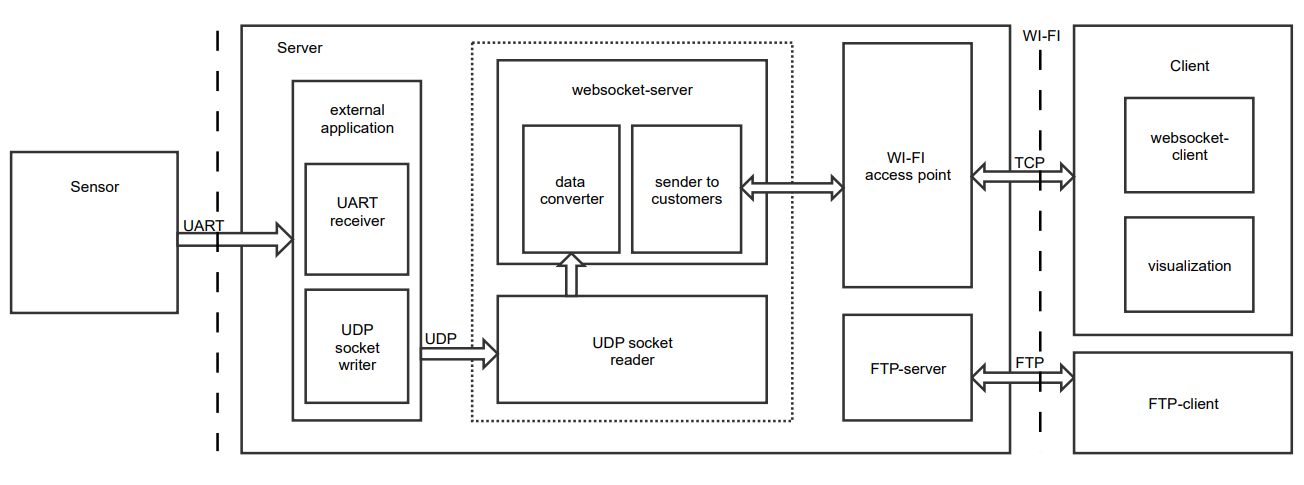
Below is the general scheme for implementing the entire system.
Below is the general scheme for implementing the entire system.
Generalized structural scheme
An alternative is to read the data from the sensor using PHP language.
But this method is slower and it was necessary to abandon its application.
But this method is slower and it was necessary to abandon its application.
As an operating system for Raspberry Pi there can be chosen either Ubuntu-16.04 or Raspbian. A step-by-step configuration process for each system can be viewed below.
I recommend using Raspbian for 2 reasons. Firstly, the OS is optimized for working on Raspberry Pi. Secondly, the configuration process is much easier and will take less than an hour on average.
I recommend using Raspbian for 2 reasons. Firstly, the OS is optimized for working on Raspberry Pi. Secondly, the configuration process is much easier and will take less than an hour on average.
Ubuntu-16.04
Server Start
Server installation lasts a fairly long time, about 30-40 minutes.
- Use ubuntu-16.04 (ubuntu-16.04-preinstalled-server-armhf+raspi3.img);
- Install LAMP:
sudo apt-get install lamp-server^ phpmyadminsudo /etc/init.d/apache2 startsudo chmod -R 777 /var/www - Install FTP-server:
sudo apt-get install vsftpdsudo systemctl start vsftpdsudo systemctl enable vsftpdsudo ufw allow 20/tcpsudo ufw allow 21/tcpsudo cp /etc/vsftpd.conf /etc/vsftpd.conf.origsudo nano /etc/vsftpd.conf - Edit ftp config /etc/vsftpd.conf:
anonymous_enable = NO
local_enable = YES
write_enable = YES
local_umask = 022
dirmessage_enable = YES
xferlog_enable = YES
xferlog_std_format=YES
connect_from_port_20 = YES
listen=YES
listen_ipv6=NO
pam_service_name=vsftpd
userlist_enable = YES
userlist_file=/etc/vsftpd.userlist
userlist_deny=NO
- Create new user:
sudo useradd -m -c "mplab" -s /bin/bash mplabsudo passwd mplabecho "mplab" | sudo tee -a /etc/vsftpd.userlistcat /etc/vsftpd.userlist - Restart FTP-server;
- Paste all project files from ./app into /var/www/html;
- Start LAMP:
sudo /etc/init.d/apache2 start - Move to server/index.php folder and start php server:
cd /var/www/html/sensor/vendor/morozovsk/websocket-examples/chat/server/php index.php start
Wi-Fi Hotspot Setup
- Install hostapd:
sudo apt-get install hostapd isc-dhcp-server - DHCP-server settings:
sudo nano /etc/dhcp/dhcpd.conf
#option domain-name "example.org";
#option domain-name-servers ns1.example.org, ns2.example.org;
authoritative;
subnet 192.168.42.0 netmask 255.255.255.0 {
  range 192.168.42.10 192.168.42.50;
  option broadcast-address 192.168.42.255;
  option routers 192.168.42.1;
  default-lease-time 600;
  max-lease-time 7200;
  option domain-name "local";
  option domain-name-servers 8.8.8.8, 8.8.4.4;
}
- Edit isc-dhcp-server:
sudo nano /etc/default/isc-dhcp-server
INTERFACES=”wlan0″
- Static ip configuration:
sudo ifdown wlan0sudo nano /etc/network/interfaces
#auto wlan0
allow-hotplug wlan0
iface wlan0 inet static
address 192.168.42.1
netmask 255.255.255.0
sudo ifconfig wlan0 192.168.42.1- WI-FI config:
sudo nano /etc/hostapd/hostapd.conf
interface=wlan0
driver=nl80211
ssid=PI_sensor_v1
hw_mode=g
channel=6
macaddr_acl=0
auth_algs=1
ignore_broadcast_ssid=0
wpa=2
wpa_passphrase=mplabsensor
wpa_key_mgmt=WPA-PSK
wpa_pairwise=TKIP
rsn_pairwise=CCMP
sudo nano /etc/default/hostapdDAEMON_CONF=”/etc/hostapd/hostapd.conf”
- NAT settings:
sudo nano /etc/sysctl.conf
net.ipv4.ip_forward=1
sudo sh -c "echo 1 > /proc/sys/net/ipv4/ip_forward"sudo iptables -t nat -A POSTROUTING -o eth0 -j MASQUERADEsudo iptables -A FORWARD -i eth0 -o wlan0 -m state --state RELATED,ESTABLISHED -j ACCEPTsudo iptables -A FORWARD -i wlan0 -o eth0 -j ACCEPTsudo sh -c "iptables-save > /etc/iptables.ipv4.nat"sudo nano /etc/network/interfacesup iptables-restore < /etc/iptables.ipv4.nat
- Updata hostapd(optional):
wget http://adafruit-download.s3.amazonaws.com/adafruit_hostapd_14128.zipunzip adafruit_hostapd_14128.zipsudo mv /usr/sbin/hostapd /usr/sbin/hostapd.ORIGsudo mv hostapd /usr/sbinsudo chmod 755 /usr/sbin/hostapd - To startup:
sudo service hostapd startsudo service isc-dhcp-server startsudo update-rc.d hostapd enablesudo update-rc.d isc-dhcp-server enable - Other:
sudo /usr/sbin/hostapd /etc/hostapd/hostapd.conf- start hostapd.sudo service hostapd status- hostapd status.sudo service isc-dhcp-server status- isc-dhcp-server status.
Possible issues:
- Timeout for connection search eth0 in 5 minutes at system start.
Solution:nano /lib/systemd/system/networking.service
TimeoutStartSec = 5sec
- You must enter a password to get started.
Solution:nano /etc/systemd/system/getty.target.wants/getty@tty1.service
ExecStart=-/sbin/agetty --autologin mplab --noclear %I $TERM
- Adding the websocket server script to startup.
nano /etc/rc.local
Before "exit 0" add:
cd /var/www/html/vendor/morozovsk/websocket-examples/chat/server
php /var/www/html/vendor/morozovsk/websocket-examples/chat/server/index.php start &
- Adding turn on button (http://j.gs/CByW).
nano /etc/rc.local
Before "exit 0" add:
sudo bash /home/mplab/sys/shutdown.sh
- Fixing recursive fault but reboot is needed.
No solution!
Raspbian
Server Start
- Install LAMP Server:
sudo apt-get install apache2 -ysudo a2enmod rewritesudo service apache2 restartsudo nano /etc/apache2/apache2.conf
<Directory /var/www/>
 Options Indexes FollowSymLinks
 AllowOverride All
 Require all granted
</Directory>
sudo service apache2 restart- Install PHP:
sudo apt-get install php libapache2-mod-php -y - Setup FTP:
sudo apt-get install vsftpd -ysudo nano /etc/vsftpd.conf
#local_enable=YES
#ssl_enable=NO
# CUSTOM
ssl_enable=YES
local_enable=YES
chroot_local_user=YES
local_root=/var/www
user_sub_token=pi
write_enable=YES
local_umask=002
allow_writeable_chroot=YES
ftpd_banner=Welcome to my Raspberry Pi FTP service.
sudo usermod -a -G www-data pisudo usermod -m -d /var/www pisudo chown -R www-data:www-data /var/wwwsudo chmod -R 775 /var/wwwsudo service vsftpd restartUse to connect:
- Host – 192.xxx.x.xxx (IP address of your Pi with no prefix)
- Port – 21
- Protocol – FTP (File Transfer Protocol)
- Encryption – Use explicit FTP over TLS if available
- Logon Type – Normal (username & password)
- Username – pi
- Password – yourPass
Wi-Fi Hotspot Setup
- Install Raspap:
wget -q https://git.io/voEUQ -O /tmp/raspap && bash /tmp/raspap - Install hostapd:
sudo apt-get install hostapd isc-dhcp-server - Customize interfaces.d:
sudo nano /etc/network/interfaces.d
auto lo
iface lo inet loopback
auto eth0
allow-hotplug eth0
iface eth0 inet dhcp
allow-hotplug wlan0
iface wlan0 inet static
address 10.3.141.1
netmask 255.255.255.0
Set up auto-update
- Change permissions on all files and folders:
sudo chmod -R 777 var/www/html - Change owner for all files and folders in server dir:
cd /var/www/htmlsudo chmod www-data:www-data . - Create new local repo in
var/www/html/upgrade
Important
Do not forget to rename default ```/var/www/html``` to arbitrary name. By default ```/var/www/html``` contain Raspap GUI web-interface. Create new html folder and place all files from whis repo.Issues
- Uncaught Error: Call to undefined mb_check_encoding
Solution:
sudo apt-get install php7.0-mbstring
sudo service apache2 restart
Other
After all the manipulations, you should get in
var/www/html a similar structure:client
css
img
js
svg
service
bash
img
php
upgrade
html
serial
service
update.php
vendor
composer
morozovsk
autoload.php
gkv_udp_send
index.html
serial_start.sh
To start the autorun, edit the file
/etc/rc.local#!/bin/sh -e
#
# rc.local
#
# This script is executed at the end of each multiuser runlevel.
# Make sure that the script will "exit 0" on success or any other
# value on error.
#
# In order to enable or disable this script just change the execution
# bits.
#
# By default this script does nothing.
# Print the IP address
_IP=$(hostname -I) || true
if [ "$_IP" ]; then
printf "My IP address is %s\n" "$_IP"
fi
echo 1 > /proc/sys/net/ipv4/ip_forward #RASPAP
iptables -t nat -A POSTROUTING -j MASQUERADE #RASPAP
sudo bash /var/www/html/service/bash/shutdown.sh &
cd /var/www/html/vendor/morozovsk/websocket-examples/chat/server
php index.php start &
exit 0
Client
- Connect to access point.
- Go to local server address(http://10.3.141.1).
Interface
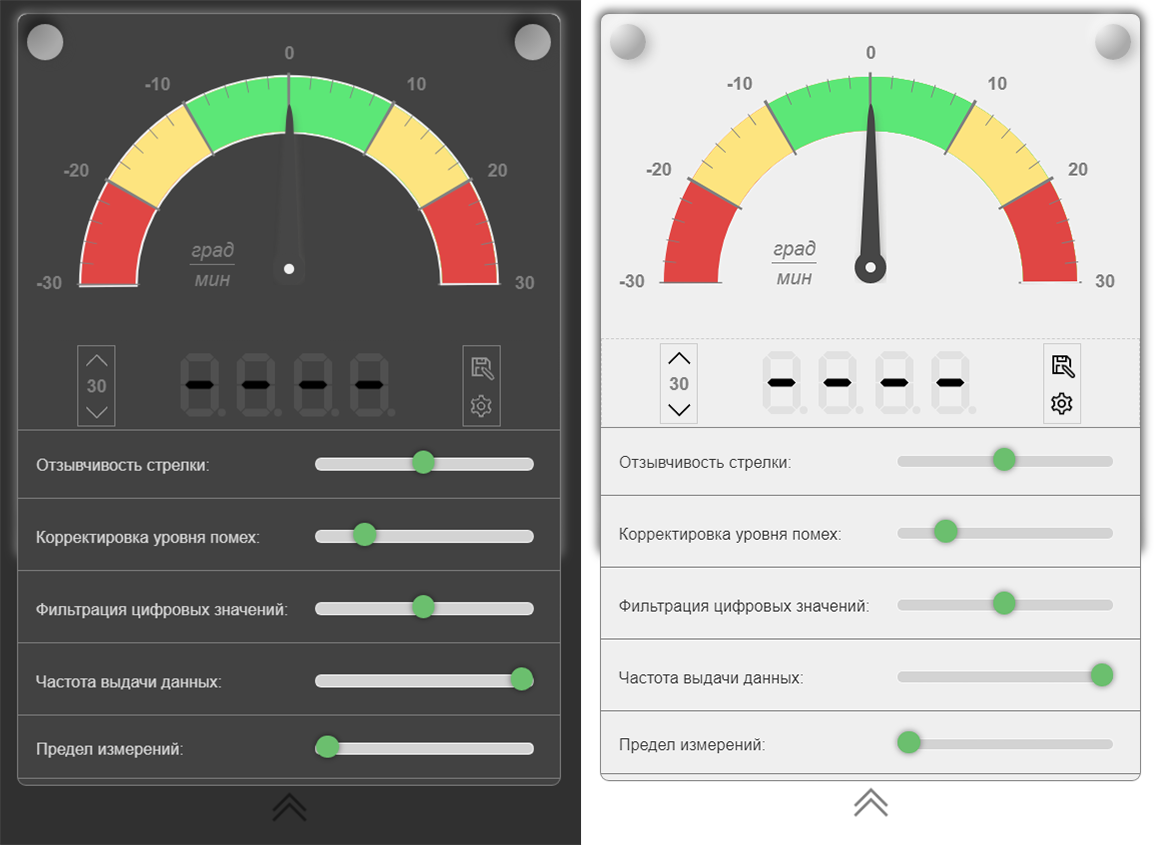
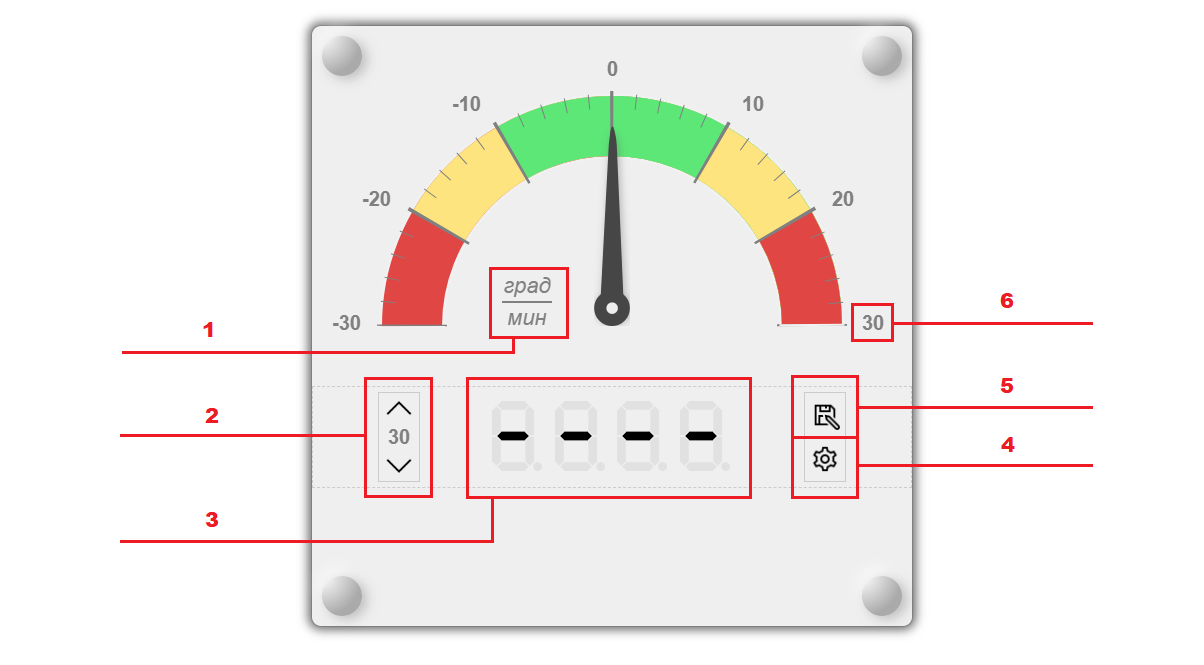
Explanations:
- Units (grad/min).
- Change the measurement limit of the instrument(range: 30-300, every 15).
- Digital indicator of the exact value.
- Settings button.
- Save all in log button.
- Current measurement limit.
Commentaires
Enregistrer un commentaire